2023-09-03: Intro To NES Game Hacking with .NET Tools
(This article is also available via the short link tomrei.ch/nes)
Introduction
As a kid I dreamed of diving into NES game code, in part to make my existing games easier, maybe by giving myself infinite lives, or disabling a countdown timer. Recently I revisited this dream and discovered how approachable it is using modern tools, including those written in .NET. Given the limited hardware capabilities of the NES, it is easy for a modern software engineer with a moderate understanding of hardware concepts and basic assembly to begin tracing through game code quickly and with relative ease. Although there are countless ways to get started, I thought I'd share my findings and methods.
Getting Started
To get started, it helps to know a little bit about the various parts of the NES and how the tools we'll be using relate to them.
The NES Hardware
This page does a great job of running down the NES hardware in greater detail, but I'll drop a quick tl;dr version here:
- CPU: Ricoh 2A03, based on the popular 8-bit 6502 architecture, running at 1.79 MHz in NTSC regions.
-
Memory:
- 2 KB "Static RAM" (SRAM, also known as "Work RAM" or WRAM) used to store variables, the stack, and buffer space.
- Memory-mapped system components pointing to the PPU, APU, and Controllers.
- Game Data: Physical cartridges with 49.97 KB of accessible data, including program and character ROM.
- Graphics: Proprietary chip called the Picture Processing Unit (PPU).
- Audio: Audio Processing Unit (APU) embedded within the CPU consisting of 5 channels of audio.
Don't worry too much about the details at this stage. For the purposes of this article, understanding the CPU is based on a 6502 architecture and that most game variables are stored in WRAM are key takeaways.
Mesen: A .NET NES Emulator & Debugger
Now that we know a bit about the NES hardware, we can begin to talk about the software we'll be using to do our debugging. For this I have chosen Mesen. Mesen is not only an excellent emulator for the NES, it also supports SNES, Game Boy, and PC Engine. Perhaps more importantly for our purposes, it comes with an outstanding suite of debugging tools. And of course, it doesn't hurt that it's open source and written in .NET, so you can dig even further into how it works if you like. We'll just scratch the surface of what this amazing piece of software is capable of in this article.
Getting Games From Your Cartridges
Next up we'll need some actual games to mess with. To do this, you'll need a way to pull the code off your cartridges. There are a few devices available that are capable of this. I recommend trying the INLretro which is capable of creating ROM files from Famicom, Sega Genesis, N64, NES, SNES, Gameboy, and GBA games. Again the software is all free and open source, so depending on how deep you want to go, you'll be able to see how it all works.
Mesen Debugging Tools
Mesen is an excellent emulator in its own right, but its debugging tools really shine. Let's briefly walk through a few of the ones we will be using in this article.
Debugger
Saving the best for first, the debugger is star of the show, allowing you to see a disassembled version
of the 6502 code, set breakpoints, step through, view watch variables, and perform many other actions
you would expect to see in a modern debugging tool like Visual Studio.
Memory Viewer
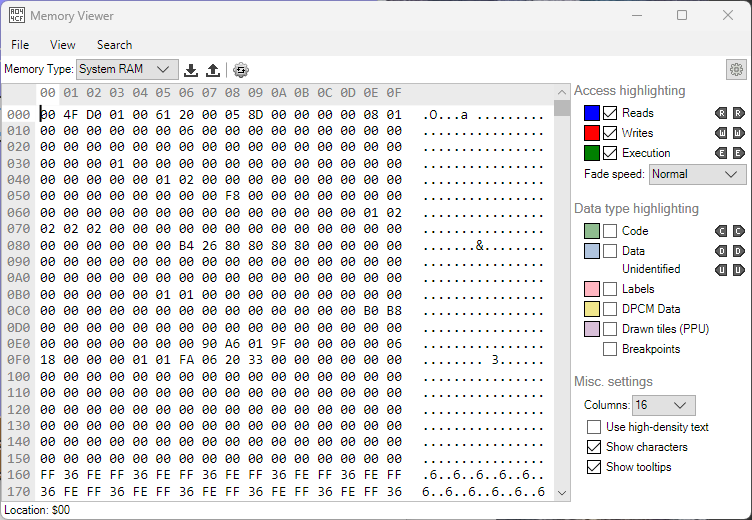
The Memory Viewer gives you a live snapshot of a given set of memory. You can quickly search for a value,
pivot to a specified location, or view highlighted actions as they happen real-time.
Memory Search
The Memory Search window assists in finding memory and is especially helpful for locating a particular
memory address containing desired data given a set of search parameters. For each location, it lists
the current value, previous value, a read/write count, as well as a counter since the last write.
Tilemap Viewer
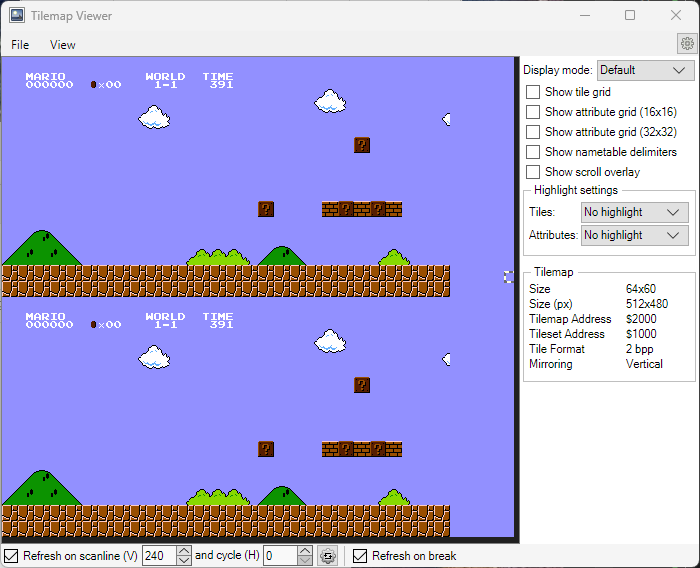
The Tilemap Viewer provides a live view of the in-memory background layer as it appears to the player
on the screen. Mousing over gives an index to each area in memory as well as the tile currently
assigned to it.
Tile Viewer
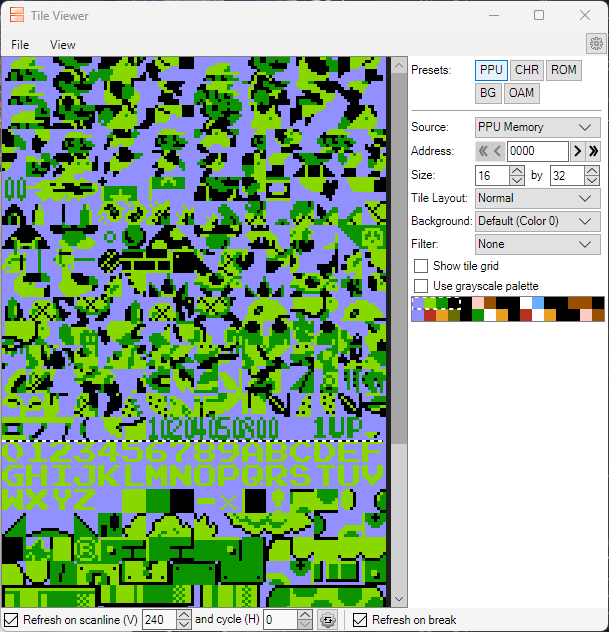
The Tile Viewer gives a live glimpse at the PPU memory; effectively the currently loaded character
map. These are the tiles that make up the sprites displayed on the foreground of the screen.
Sprite Viewer
![]()
Similar to how the Tilemap Viewer provides a live view of the background layer displayed on-screen,
the Sprite Viewer provides a live view of the sprites displayed on foreground layer of the screen.
Register Viewer

As the name implies, the Register Viewer gives live addresses and values of major system registers
related to the PPU and APU.
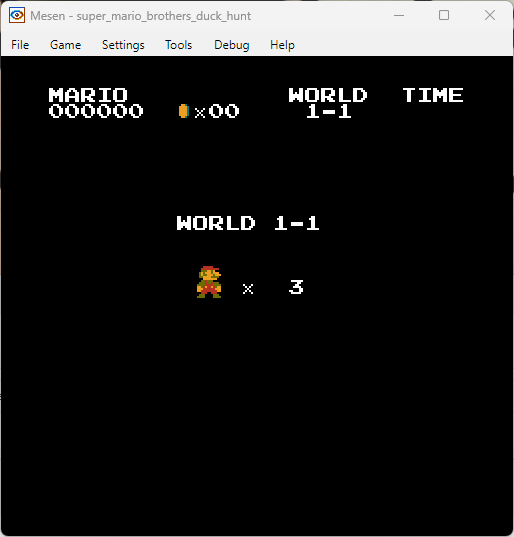
Walkthrough: Infinite Lives in Super Mario Bros
Now that we're somewhat familiar with the debugging tools, let's walk through a quick example of how we might use them. Perhaps the most requested cheat in a platformer like Super Mario Bros is for infinite lives, and, given the tools we've seen, modifying the code to do this is relatively simple. Breaking it down into high-level steps, one way to do this would be:
- Find the address in SRAM where Mario's lives are stored
- Find the game code location where this number is decremented when Mario dies
- Change the game code to skip the decrement
Finding The Life Variable in SRAM
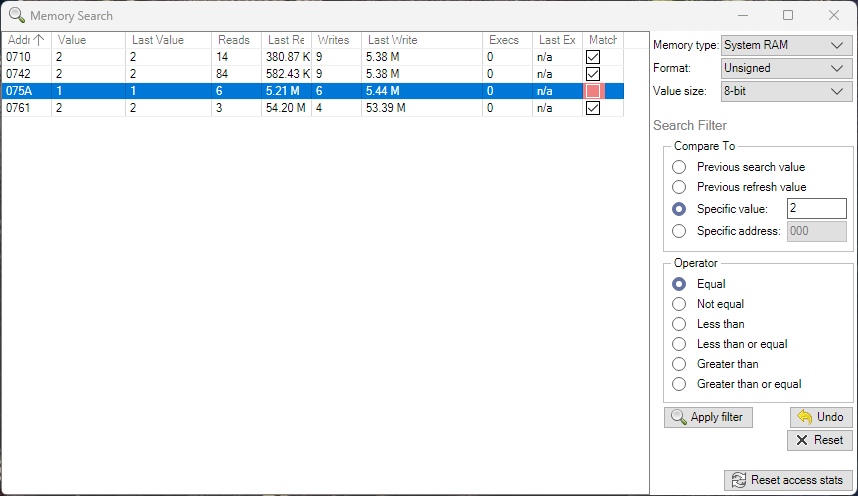
The first step is to find where Mario's life counter is stored in SRAM. The easiest way to do this is
probably to use the Memory Search tool. Knowing that Mario begins the game with 3 lives, it seems likely
that, at the start of the game, there is a location somewhere in SRAM that contains either a 2, 3,
or 4, depending on how the developers chose to store the value. When Mario dies, this value will be
decremented. Knowing these two things, we can narrow it down a bit. Let's start by loading a new game
and searching for the unsigned value '2' in RAM. As we walk Mario forward, a few of these values will
change, and so we can rule them out. Eventually we're left with only a few potential spots before Mario
dies:

Now let's kill Mario. Don't worry, it's for a good cause.
Interesting. When Mario died, Address 075A got decremented, and the value seems sticky. Let's kill Mario again.
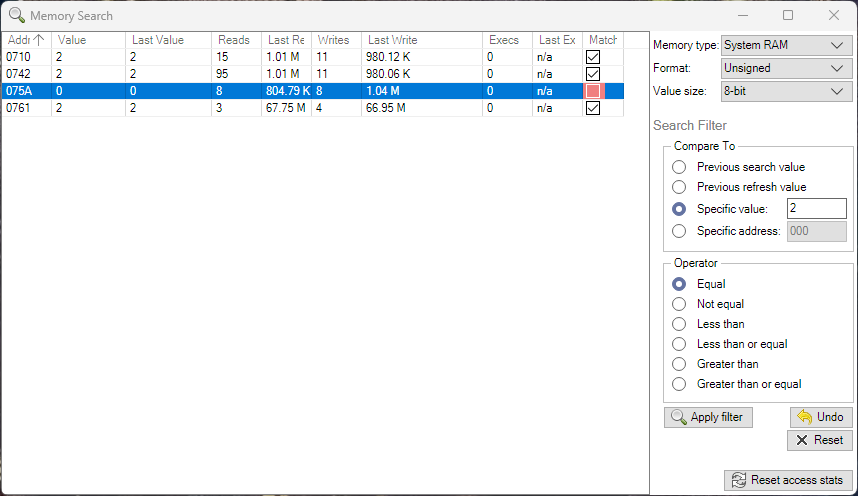
Yup, it decremented after he died yet again. Looks like we have a winner. Address 075A stores
the life count. If you're still not convinced, feel free to grab an extra life and see what happens.
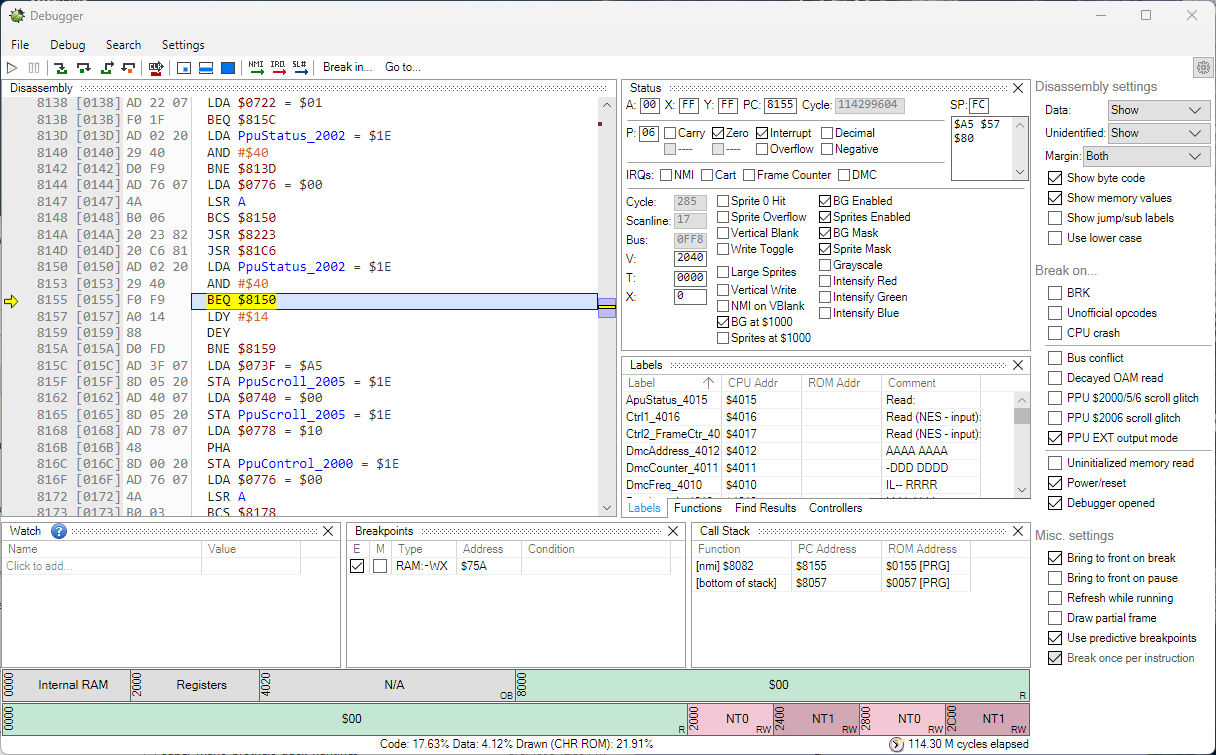
Finding The Decrement In The Code
Now that we know where Mario's lives are stored, we can easily locate the code that gets run when
he dies. Before continuing, let's start with a fresh game and a fresh set of lives. Select Game > Reset,
then start a new game. Next, open the Debugger, right-click in the Breakpoints section, and select the Add
option. A dialog appears. Select the option to add a breakpoint on System RAM write, and enter the
address. The box should look like this when you're done:

Select the OK option, and you should see the breakpoint in the list:
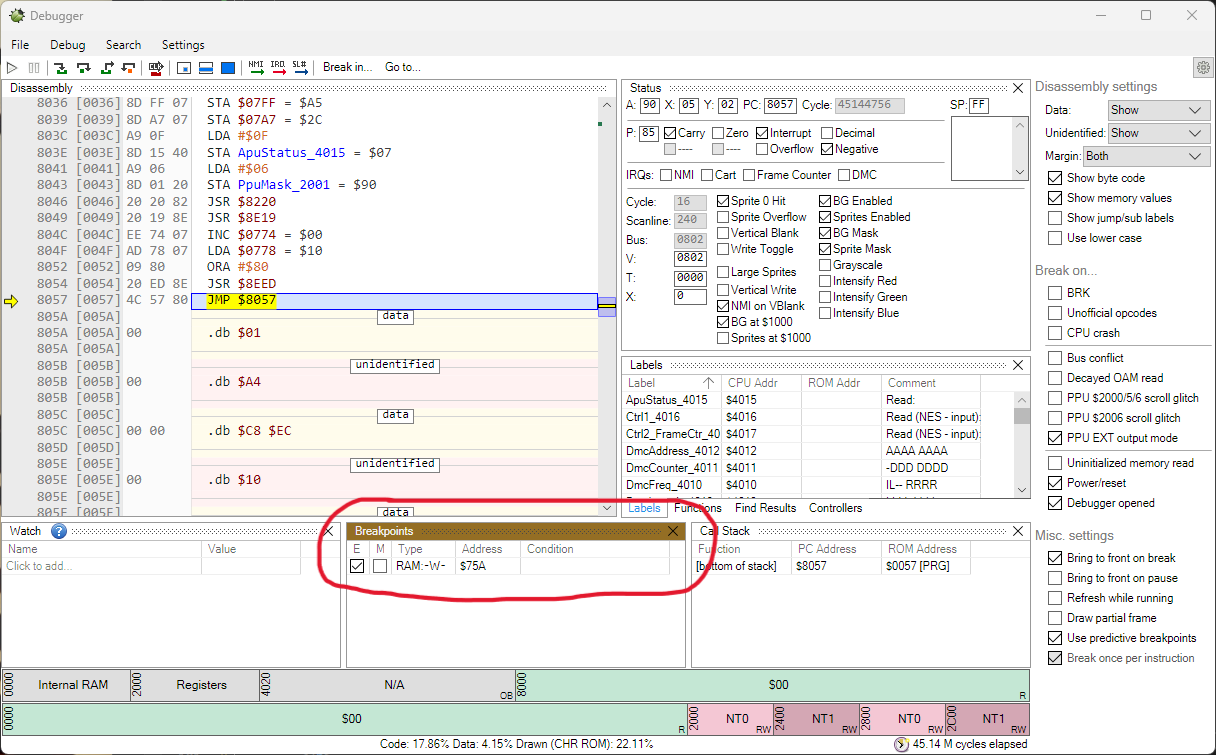
Now let's kill Mario again.
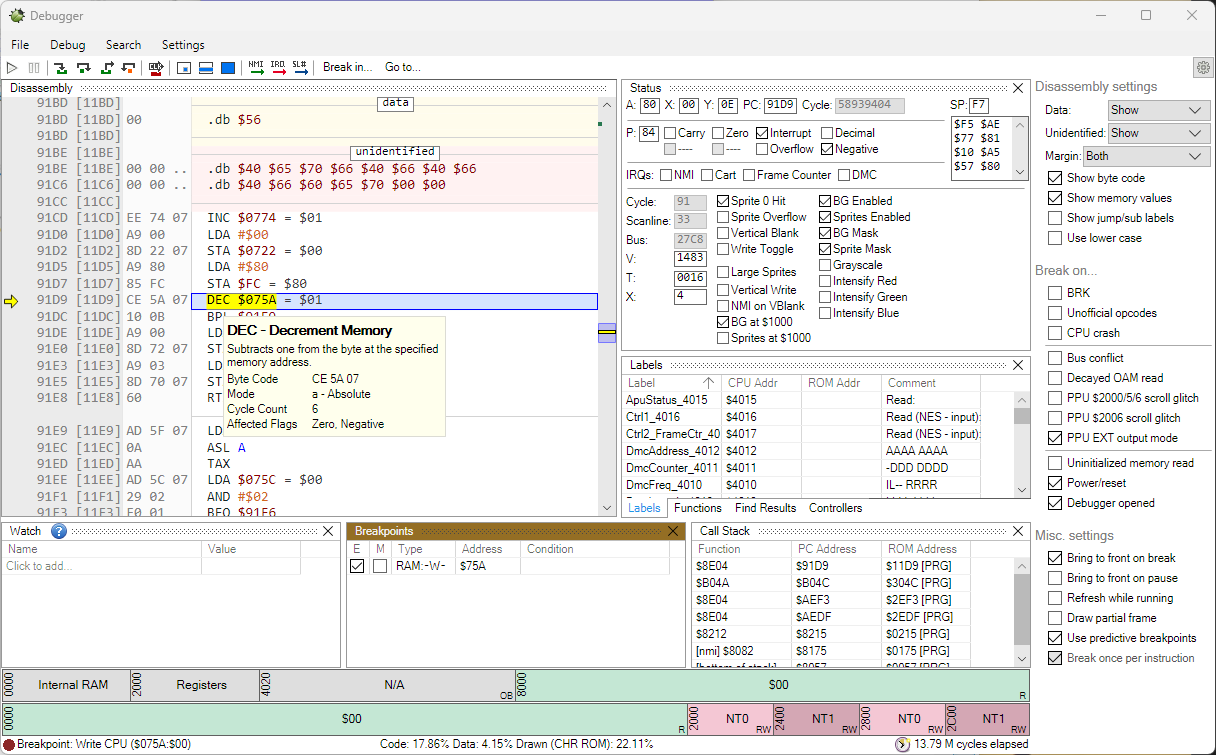
...and the game paused! If we mouse over the call, we can see it paused on a Decrement, which
is exactly what we would expect after Mario dies. So it appears location 91D9 contains a 3-byte
instruction for the decrement call.
Skipping the Life Decrement In The Code
So now we know both where Mario's lives are stored and where the code does the decrement when
Mario dies. Next let's examine what happens after the decrement. The code states:
BPL $91E9
Rolling over BPL, it appears this is a branch condition. Further, if we step through the
code, we can see that, when Mario has lives remaining, the branch condition hits and the
code jumps to location $91E9. If Mario is out of lives, the code continues. So, following
this logic, if we skip the Decrement call and just jump directly to location $91E9, the game
should continue as expected and Mario's life count should remain unchanged.
Fortunately, Mesen makes this type of modification easy. Start by right-clicking the Decrement
line and selecting "Edit Selected Code". The Assembler dialog appears:
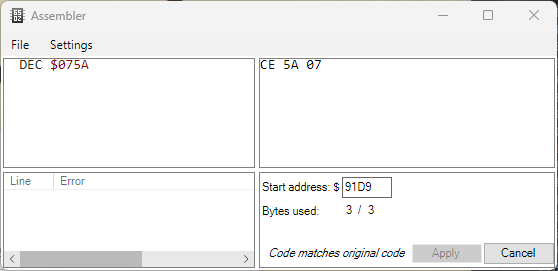
Note that the number of bytes required for this instruction is 3, as we noted before. Let's
try changing the call to just jump directly to $91E9:
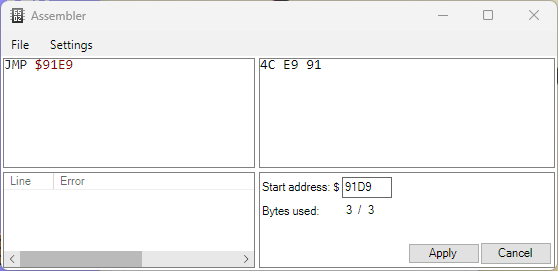
Luckily this instruction is also 3 bytes! Clicking Apply updates the code in the Disassembler
to reflect our change:
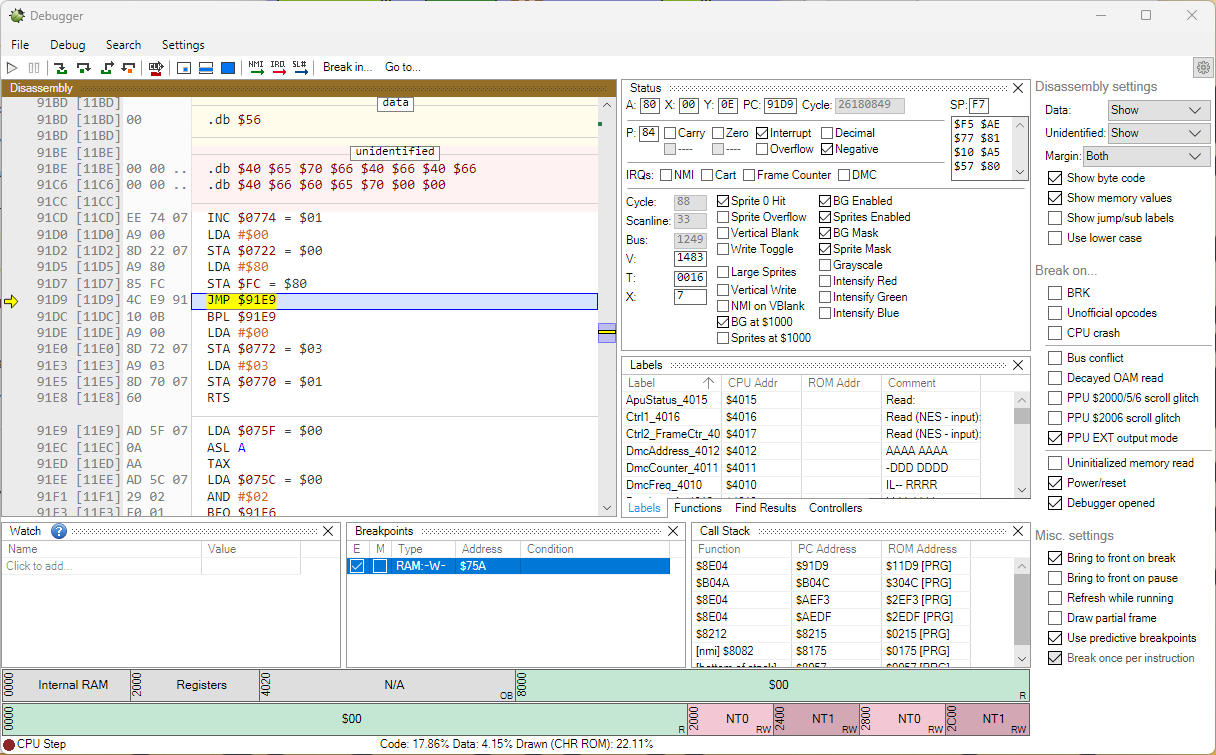
Now let's uncheck the breakpoint, press Play, and see what happens:
We still have 3 lives! Just for good measure, kill Mario a few more times. The life count remains
at 3. It appears our modification has worked!
Wrapping Up
This quick tutorial just scratches the surface on NES game hacking, but hopefully serves as a useful starting place. In the next article I will demonstrate how to apply this change we have just made to a real game on actual NES hardware using period-appropriate equipment.